During this lesson, I added piercings on my face (nose, lips, eyebrow and chin). I used all the studs from my ears.
For my lip piercings and nose, I used images from flickr. For both piercings I copied the image into photoshop, added a mask and painted out the excess bits I didn't need. Then moved the image to the places I needed them.
Here's my lip piercing image:
https://www.flickr.com/photos/27790728@N02/3065050580/in/photolist-5ERbKE-6ddkpK-ddRtLj-595wXJ-8CUs4z-KQdy9-bxhYrs-bAmEWJ-G8j6h-ASv2R-bJJYCX-ayzPu-pygMM-ejWG5i-7qLkaD-bDDmHt-6dqukZ-9r8egC-6v9NTi-7qYapw-7qUfHM-6ZK1um-ae95t-aezfo-ae9ea-aexfF-ae8uW-aezoE-aezA4-ae8kw-37Mzgh-8ZZWPM-6ZzCtV-618HHs-ddRsSW-6E7Prf-UGH2D-2JXKbB-6ZqMHy-7Nc87E-dKr5WD-5aKBxD-7qYaGm-7qYazy-6GscoF-8XvhiS-7VnAYh-aKp17p-btXQsX-c2zdxw-6cCnf9
Here's the image I used for my nose piercing (it is a cow):
https://www.flickr.com/photos/24522216@N03/2359819339/in/photolist-4AwG5k-3FkSB-3cJVy1-5uZs1f-hrpJD-4PsEnv-5tQJTp-dAJfpB-bB7bEc-8yDLNx-g8d8M2-5VMCsN-6Xvr6U-7412eH-ik85ym-7THkV6-9EnWXh-65fjN3-5bk2Rr-MVxVa-mKpPJ-ejYqts-G8j6h-595wXJ-ec7bs8-eGVi4R-edviU5-5P8u9f-66ZrRk-7MFgYR-4BapTf-69aHhN-61F11z-6jgNRr-9U6VJx-9aRgZK-7Y2AD1-7kvsyR-ajzYBJ-4LA8No-4YswcJ-4q75Wm-9QwLAm-5M9zx2-9vdjc1-9vdjef-4NZfsR-93npue-cZeZHS-77hD5S-5gRakV
Sunday, 23 March 2014
Colourful
This time I decided to turn my original self back into colour, as i felt it suited the background a lot better.
I also changed the colour of my shirt to black. I am thinking of putting a pattern on it as well.
How I changed the colour of my shirt:
- Made a new layer
- Selected paint brush tool
- Used the colour black (soft brush)
- Roughly coloured in the shirt
- Selected the blend mode to soft light
- Added a mask to the layer
- Coloured out the excess black
Taa da! You have a different coloured shirt!
I also added fog in the light area, Mr Andrews showed how to do it in the lesson
- Make a new layer
- Make sure the two colours on the bottom left hand side are the colours you want to use in your fog (mine were black and white)
- Select Filter, Render then select clouds
Your fog is ready to use!
I also changed the colour of my shirt to black. I am thinking of putting a pattern on it as well.
How I changed the colour of my shirt:
- Made a new layer
- Selected paint brush tool
- Used the colour black (soft brush)
- Roughly coloured in the shirt
- Selected the blend mode to soft light
- Added a mask to the layer
- Coloured out the excess black
Taa da! You have a different coloured shirt!
I also added fog in the light area, Mr Andrews showed how to do it in the lesson
- Make a new layer
- Make sure the two colours on the bottom left hand side are the colours you want to use in your fog (mine were black and white)
- Select Filter, Render then select clouds
Your fog is ready to use!
New Background
Mr Andrews discussed my avatar with me and the ideas he started talking about, made me realise my old background, wasn't every effective with my avatars personality.
My old background was reflecting a more classy, than edgy and rebellious.Mr Andrews suggested graffiti. I took on board his suggestions and it looks even better! The image was very colourful, so I decided to bring down the lightness of the photo to make it look darker. However, the sky is annoying me quite a bit, as it is way too bright. I also added some piercings below the lip. I used the clone stamp, copied the earring on my ear and pasted it onto the skin.
New Tattoo's
This time I changed the design of the tattoo to a much tribal pattern, that covers the whole sleeve.
I put both the same pattern on both arms and I am thinking of placing the design on the neck as well. Maybe some piercings could be added. To place the tattoo's on the arms, I used the same procedure as I did the last time I placed a tattoo.
Friday, 21 March 2014
Sad Avatar Added!
This time, I added a sad avatar, to reflect the sadness that she keeps inside of her
Assignment Improvement!
I worked on my avatar a bit more and came up with the idea that my avatar should have two selves beside her, showing her inner emotions that are trapped inside. As my avatar is a very closed person, who doesn't like to express her thoughts and emotions.
The red self is the anger that she has kept inside. I am planning on adding a second emotion, preferably sad, as I can use the colour blue. For the angrier emotion, I used the hue/saturation tool and changed the image to the colour red and turned the opacity to 60%. I also added a tattoo to my avatar, as it gives a more rebellious side to the avatar. Again, I used a youtube tutorial to assist me to place it.
This is how I did it:
http://www.youtube.com/watch?v=C22J1-c_FMk
Displacement Map:
- Make a displacement map (use the burn and dodge tool to bring out any veins, muscles, bones etc.)
- Make sure you desaturate the image
- Make a new layer and fill it with the colour grey
- Then select soft light, so you can see your desaturated image
- Go to Filter, Noise, then despeckle, this will make all the adjustments you made, flattened
- Save it as you will need to use it later on
Tattoo
- Get the same image, place the image
- Place the image of your tattoo, use a template or design (just make sure it has a white background)
I got mine from Flickr:
https://www.flickr.com/photos/68870181@N03/9596166653/in/photolist-fBYS2c-j6CY5V-ecEJZn-kNi58a-9r5fQm-eYNQHV
- Change the blend mode of the tattoo to multiply (this will take away the white background and make it transparent
- Place your tattoo where you would like it
- Go to Filter, Distort, Displace, select your displacement map and the tattoo image will follow the texture of the skin where you placed it
- Drag the opacity down to 50-60%
- Now feel free to adjust, place a mask and get rid of excess bits!
The red self is the anger that she has kept inside. I am planning on adding a second emotion, preferably sad, as I can use the colour blue. For the angrier emotion, I used the hue/saturation tool and changed the image to the colour red and turned the opacity to 60%. I also added a tattoo to my avatar, as it gives a more rebellious side to the avatar. Again, I used a youtube tutorial to assist me to place it.
This is how I did it:
http://www.youtube.com/watch?v=C22J1-c_FMk
Displacement Map:
- Make a displacement map (use the burn and dodge tool to bring out any veins, muscles, bones etc.)
- Make sure you desaturate the image
- Make a new layer and fill it with the colour grey
- Then select soft light, so you can see your desaturated image
- Go to Filter, Noise, then despeckle, this will make all the adjustments you made, flattened
- Save it as you will need to use it later on
Tattoo
- Get the same image, place the image
- Place the image of your tattoo, use a template or design (just make sure it has a white background)
I got mine from Flickr:
https://www.flickr.com/photos/68870181@N03/9596166653/in/photolist-fBYS2c-j6CY5V-ecEJZn-kNi58a-9r5fQm-eYNQHV
- Change the blend mode of the tattoo to multiply (this will take away the white background and make it transparent
- Place your tattoo where you would like it
- Go to Filter, Distort, Displace, select your displacement map and the tattoo image will follow the texture of the skin where you placed it
- Drag the opacity down to 50-60%
- Now feel free to adjust, place a mask and get rid of excess bits!
First Image of Avatar
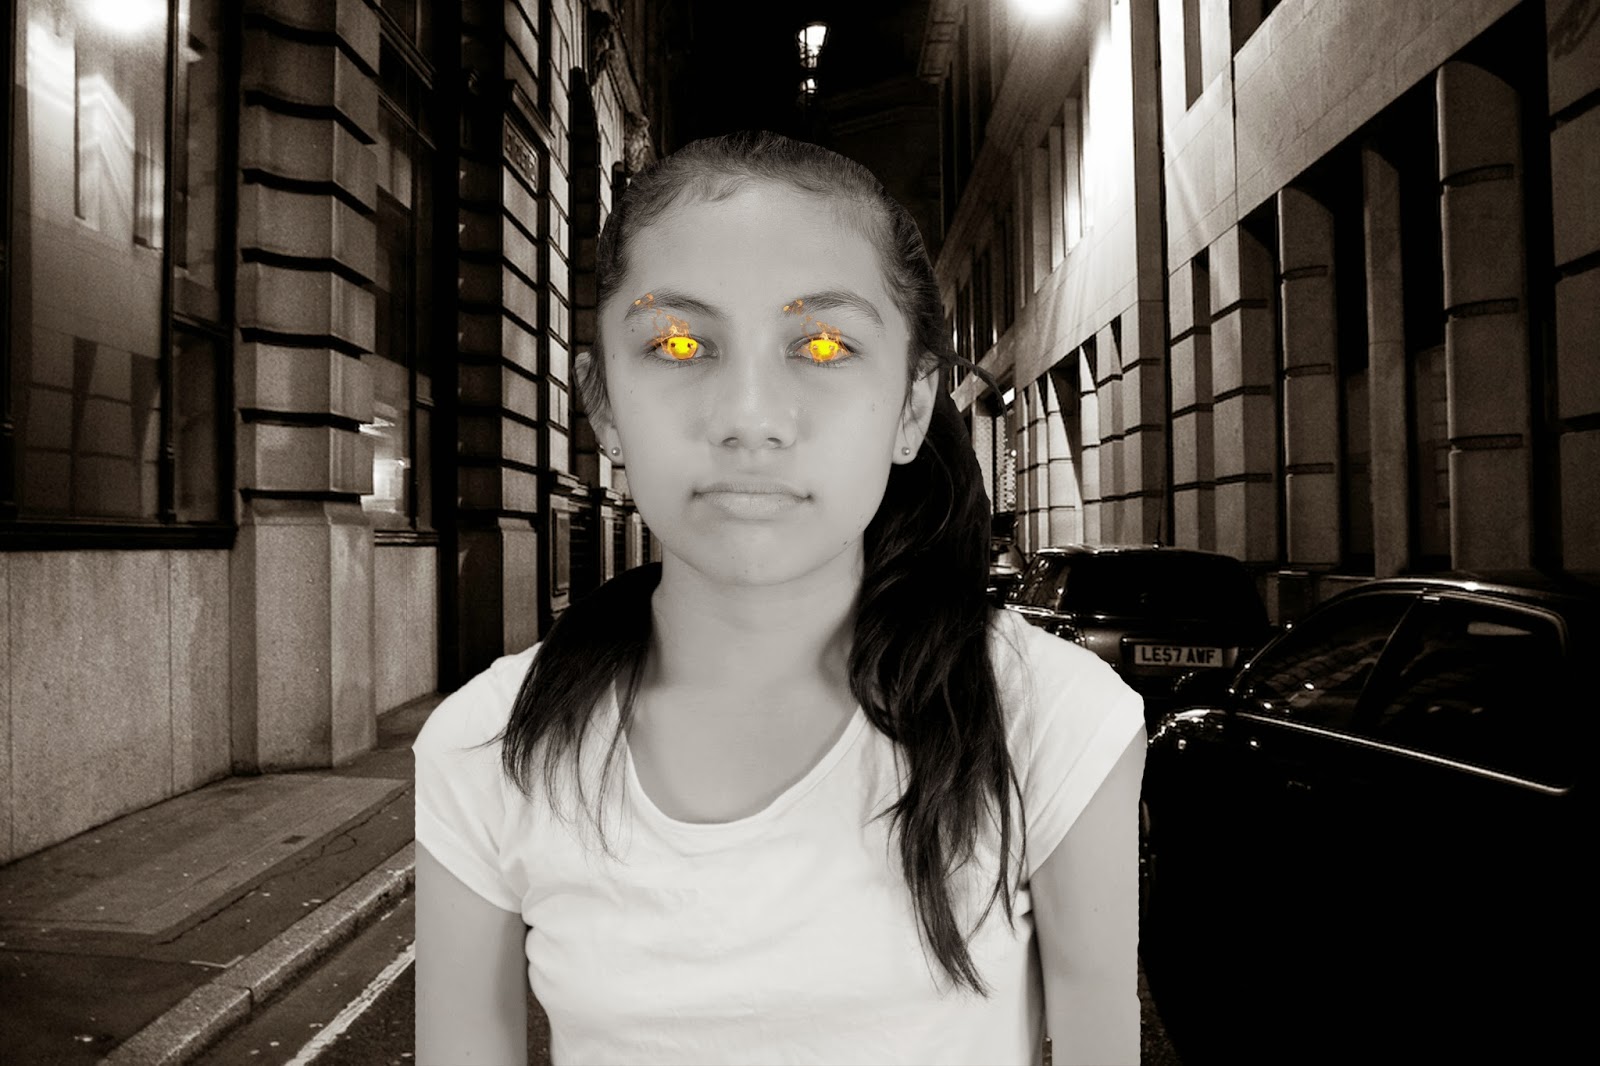
I borrowed a laptop out on the weekend and worked on this image:

My avatar is the complete opposite of myself. I decided to make my avatar black and white instead of colour, as it reflects the avatars personality as dull. To place the fire in my eyes, I used a youtube tutorial to help me. I decided fire because it would be a good representation of anger.
Here's how I did it:
http://www.youtube.com/watch?v=mVvnZncUIUY
- Desaturate the image, select levels adjust them
- Lowered contrast, invert image
- Merge all Layers
- Channels, click RGB
- Lock Transparent pixels
- Select paint brush tool, paint over the image (Make sure the colour is an orange warm colour)
- Select outer glow, make sure the colour you select is red
- Then use the pain brush tool, to paint on the edges the colour red to give it a more realistic look
- Select a fire stalk image
I used this image from flickr:
https://www.flickr.com/photos/37952845@N03/9619954917/in/photolist-fE5MrF-fCy2Gj-bsK1HF-88PAA1-bsK1kk-cLwW7b-iZMet1-9iw6dg-7F4FcM-a1XFpZ-eDeGyQ-fCSuP2-8tVHB4-86sL7K-gJvdCu-861hb5-bibJqg-m7SEYv-kx1WPV-aBn9tE-aRCaAv-879aD7-dNNWhe-a1JFeD-8duEMu-c8bJy7-c8bJqU-86MyyV-81Et2H-81HBLq-81EsYr-81HBH9-bh7eS6-fzqRjL-aQZUXZ-d96WCd-eB1Q1n-dUzJVw-dNQRXB-9xyJKw-7GR4Pi-8f9vtc-aRCagi-ehs86S-imjQe8-imkN6N-imkDp9-eeoHep-imjAQU-crAUVQ-d8BuZN
- Go to channels (on the fire image) and press the Green channel
- Make a copy of the fire and press Ctrl C (copy) make a new layer, then press ctrl v (paste)
That is the fire you will need to use to place on top of your image I placed my fire on top of my eye.
I chose my background because it was an alleyway, it was black and white and I think it looks very creepy. I thought it would go well with my ideas so far.
I got the image from flickr here:
http://www.flickr.com/photos/neutronboy/4242277146/
ALL IMAGES WERE CREATIVE COMMONS-LICENSED CONTENT

My avatar is the complete opposite of myself. I decided to make my avatar black and white instead of colour, as it reflects the avatars personality as dull. To place the fire in my eyes, I used a youtube tutorial to help me. I decided fire because it would be a good representation of anger.
Here's how I did it:
http://www.youtube.com/watch?v=mVvnZncUIUY
- Desaturate the image, select levels adjust them
- Lowered contrast, invert image
- Merge all Layers
- Channels, click RGB
- Lock Transparent pixels
- Select paint brush tool, paint over the image (Make sure the colour is an orange warm colour)
- Select outer glow, make sure the colour you select is red
- Then use the pain brush tool, to paint on the edges the colour red to give it a more realistic look
- Select a fire stalk image
I used this image from flickr:
https://www.flickr.com/photos/37952845@N03/9619954917/in/photolist-fE5MrF-fCy2Gj-bsK1HF-88PAA1-bsK1kk-cLwW7b-iZMet1-9iw6dg-7F4FcM-a1XFpZ-eDeGyQ-fCSuP2-8tVHB4-86sL7K-gJvdCu-861hb5-bibJqg-m7SEYv-kx1WPV-aBn9tE-aRCaAv-879aD7-dNNWhe-a1JFeD-8duEMu-c8bJy7-c8bJqU-86MyyV-81Et2H-81HBLq-81EsYr-81HBH9-bh7eS6-fzqRjL-aQZUXZ-d96WCd-eB1Q1n-dUzJVw-dNQRXB-9xyJKw-7GR4Pi-8f9vtc-aRCagi-ehs86S-imjQe8-imkN6N-imkDp9-eeoHep-imjAQU-crAUVQ-d8BuZN
- Go to channels (on the fire image) and press the Green channel
- Make a copy of the fire and press Ctrl C (copy) make a new layer, then press ctrl v (paste)
That is the fire you will need to use to place on top of your image I placed my fire on top of my eye.
I chose my background because it was an alleyway, it was black and white and I think it looks very creepy. I thought it would go well with my ideas so far.
I got the image from flickr here:
http://www.flickr.com/photos/neutronboy/4242277146/
ALL IMAGES WERE CREATIVE COMMONS-LICENSED CONTENT
Subscribe to:
Posts (Atom)